You might
also enjoy...
Adding the Vinyl Decal to Your Mug
Learn to apply the decal to your DIY resin tumbler mug
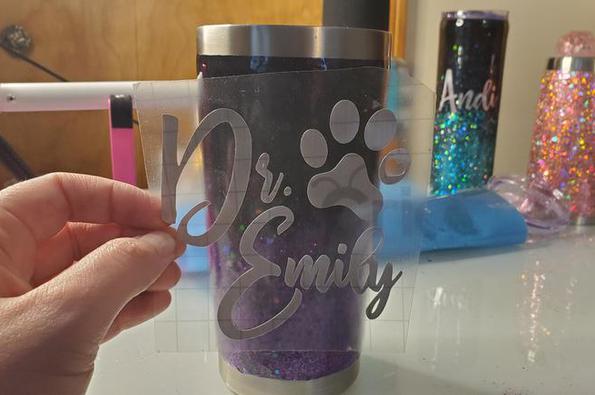
This quick tutorial will show you how to add your vinyl decal to your resin tumbler mug flawlessly every time. (This is one of the lessons from my DIY Resin Tumbler Course. If you ended up here by mistake, be sure to start here on my main DIY Resin Tumbler Mug Course page.)
When you've added all the base layers you plan to add, make sure you've got a completely smooth, dry surface before you add your decal.
If you're using fine glitter, you'll probably need at least 1 coat of plain resin. For chunky glitter, or even sometimes with fine glitter, you may need to add a 2nd plain coat of resin.
Regardless, when you apply your decal, you need your surface to be free of bumpy textures, and 100% dry.
Yes, you're likely several days into making this mug by now, applying resin, letting is spin for a day, applying resin, letting it spin for a day, etc, etc. But don't worry. It's going to be worth your time. Plus it's really only about 5-10 minutes of "work" per day, so although it may take a bit of time to make these mugs, most of it is just waiting on time to pass. (And oh, how time can pass when you get memorized by your beautiful mug spinning on the turner lol)
I'll walk you through adding the decal to your mug in the video below. It's fairly easy. You might run into a little trouble because of the curves, but don't worry -- I've got 2 different methods in the video to help you avoid problems with that, plus more tips for working with decals, and even a little bit about the different textures of my favorite decal cutting materials. It's a short video that's only about 6 minutes long, but worth the watch!
(This video is only on adding the decal. You'll find all the tips for adding the sealing top coat(s) in the following lesson.)
Disclaimer: Please note that some of the links in this post may be affiliate links or ads. There is no additional cost to you, but The Scrap Room will earn a small commission should you choose to purchase through those links. Click here for my full disclaimer. Thank you for your support.


