You might
also enjoy...
How to Print Paper Craft Embellishments (Beginner to Pro Guide)
Get crisp, beautiful results every time + simple tricks to make your printables look amazing!
If you enjoyed my tutorial or found value in it, I'd appreciate it if you gave it a little love on social media!
Disclaimer: Please note that some of the links in this post may be affiliate links or ads. There is no additional cost to you, but The Scrap Room will earn a small commission should you choose to purchase through those links. Click here for my full disclaimer. Thank you for your support.


If you’ve ever printed a set of embellishments and thought “meh… why doesn’t this look as good as the preview?” — you’re not alone.
The good news? It’s almost never the design.
It’s print settings, paper choice, and a few simple techniques that make ALL the difference.
In this guide, I’m going to walk you through exactly how to print your paper craft embellishments so they look clean, vibrant, and professional — plus a few easy upgrades that instantly take them to the next level.
Supplies You’ll Need
-Printer (inkjet or laser)
-Printable embellishment files (PDF or PNG)
-Paper of choice (more on this below 👇)
-Scissors or cutting machine
-Optional: sticker maker, ink pads, adhesives

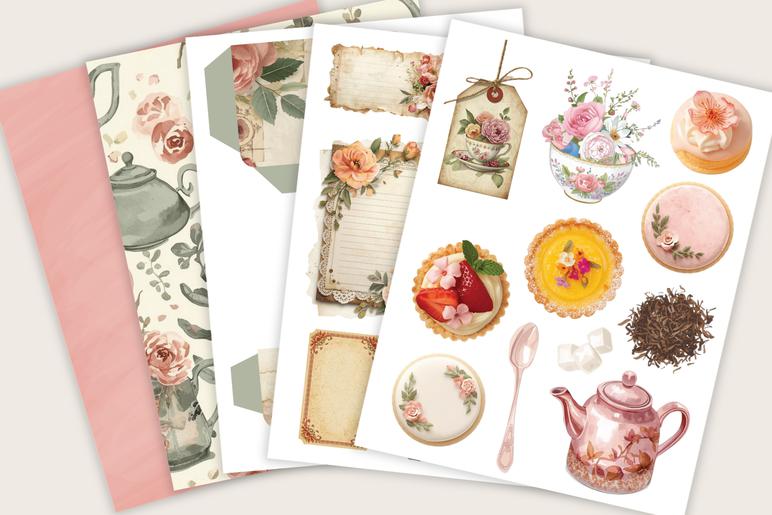
Step 1: Choose the Right Paper (This Matters More Than You Think)
Before you even hit print, your paper choice will completely change how your embellishments turn out.
For sturdy embellishments:
Use heavy cardstock (I recommend 65lb–110lb)
Perfect for tags, journal pieces, and layered embellishments
Holds shape better and feels more “finished”
Great for junk journals, scrapbooks, and cards
For stickers:
Use adhesive sticker paper
Print → cut → peel → stick
Perfect for planners, journaling, and quick decorating
Want both? (My favorite shortcut)
If you mostly want sturdy embellishments but occasionally want stickers…
👉 Consider using a simple sticker maker like the Xyron Create-A-Sticker for embellishments up to 5" wide, or if you just want to make tiny stickers (1.5" or smaller) the Xyron X150 Sticker Maker is a great option.
No setup, no mess
Just feed your embellishment through and it instantly becomes a sticker. Perfect for when you don’t want to deal with full sticker sheets
This is one of those super simple tools that makes crafting feel so much easier — which means you’ll actually use it more.
For more about how the quality of your paper can affect your printing quality, stop by my blog post Mastering Paper Choices: Elevate Your Crafting with the Right Print Materials
Step 2: Adjust Your Print Settings for the Best Results
This is where the magic happens ✨
Quick rule of thumb:
Everyday crafting → Standard quality
Special projects → High quality
But here’s the thing most people don’t realize…
👉 “High quality” vs “standard” is just the surface.
There's actually so much more that goes into these settings than you probably realize! High-quality printer settings can bring out the sharpness, vibrant colors, and professional finish you're looking for - but it uses more ink so it's important to know what these two settings *actually* mean.
If you want your prints to look WAY better instantly, you’ll definitely want to read my article about Standard vs. High Quality Print Settings:
That post goes into the details so you can make sure every project you print looks just how you want it to.
Step 3: Resize Your Printables (Super Useful Trick!)
One of my favorite things about printables is that you’re not stuck with one size.
You can easily make embellishments:
Smaller for planners
Larger for scrapbook layouts
Tiny for layered details
The easiest way to resize:
Use the scale setting in your print dialog
100% = original size
75% = 25% smaller embellishments
50% = half-size versions
✨ This is perfect for getting more variety out of a single printable.
Want to print on a custom size paper that isn't saved in your print settings?
If your printer doesn’t offer the print size you want (super common!)
👉 I’ve got a full step-by-step guide here:
This is especially helpful if you want to keep everything to scale, but print at a different size that better fits your specific journal size.
Step 4: Print, Then Cut (Your Way!)
Once printed, you’ve got a few options:
✂️ Hand cutting
Relaxing, flexible, and simple
Great for organic, imperfect styles (perfect for junk journaling!)
🤖 Cutting machines (PNG friendly)
Cricut / Silhouette / ScanNCut
Perfect for precision and bulk cutting
✨ Pro tip: Don’t stress about perfection — slightly imperfect cuts often look more handmade and charming.
Step 5: Make Your Embellishments Look Even Better
This is where your printables go from “nice” → WOW
Here are a few quick upgrades:
🖌️ Distress the edges (super easy!)
Lightly rub the edges with an ink pad
Focus on corners and uneven areas
Instantly adds depth and vintage character
📄 Layer your pieces
Stack embellishments with foam tape or glue
Creates dimension and interest
✂️ Tear instead of cut (sometimes!)
Adds a soft, organic, handmade feel
If you want even more ways to elevate your designs:
👉 Check out my full guide here:
Ways to Use Your Printable Embellishments
Once you start printing, the possibilities are endless:
Junk journals
Scrapbooking layouts
Handmade cards
Planner decorating
Smash books
Gift tags
DIY party decor
Happy mail & pen pal letters
✨ Honestly? Once you get the hang of printing, you’ll start seeing ways to use them everywhere.
Final Tips for Beautiful Results Every Time
-Use good quality paper (huge difference!)
-Don’t skip adjusting your print settings
-Try printing at different sizes for variety
-Keep it simple — you don’t need fancy tools to make something beautiful
Ready to Start Crafting?
Now that you know exactly how to print your embellishments…
Grab a printable, hit print, and start creating ✂️💕
And if you want to take your results even further, don’t forget to check out:
👉 Printer Quality Settings Guide (better prints instantly)
👉 Custom Paper Size Setup Tutorial (perfect sizing every time)
👉 13 Ways to Make Your Embellishments Look Professional (next-level results)
✨ Looking for something new to create?
I share tons of free craft printables over on Pinterest — from embellishments and papers to fun project ideas you can start right away. It’s the perfect place to find fresh inspiration whenever you need it!
Pop over, browse around, and don’t forget to save your favorites so you can come back to them later… then grab a freebie and start crafting something fun today 💕